
 |
| Laundry Basket Gardening |
Every year I do a garden. It usually consist of the typical dig up the lawn, surround by small fence, insert plants. We just moved out to the country this year and our new yard consists of a whole lot of hill! So, I decided a different approach might be better. After some thought I decided to do an above ground garden in pots. I knew I could arrange them how and where I wanted without worrying about the rain washing my plants down the hill (and good thing I did because boy did it pour this year!).
To get started I went to my local Walmart (small town doesn't have many choices) to check out pots and potting soil prices. YIKES! So expensive! Way out of the price point for my gardening budget. I finally found a hardware store that sold potting soil and compost for $3.50/40lb bag. That I could handle. I still was at a loss as to what I was going to put all my new dirt in, though. During my next grocery trip at Walmart that week I walked by the housewares aisle... the heavens parted and down came a ray of sun on $0.97 laundry baskets! OK, so maybe not, but inspiration struck all the same! I had this great idea to line these cheap little $0.97 round laundry baskets with black weed barrier to turn them into cost effective planters. I bought up what they had, and grabbed four brown rectangular baskets that were on clearance for $5.00 (they were really cute and I couldn't resist).
The first thing I had to do was figure out how to get the liner to stay in the baskets. I am a crafter, so my mind went immediately to my glue gun. I also knew that I didn't want the baskets to look like laundry baskets. To fix that I figured I would add some burlap to them in some way to give them a more rustic touch.
 |
| Finished basket planter, burlap ribbon and black weed barrier. |
 |
| Cheap white $0.97 laundry basket and finished planter basket. |
Next I put in the black weed barrier lining. I cut the width in half to make it about 4 inches taller than the basket's height. I then rolled the basket along the length of the liner until I made one full rotation. I cut it off the the roll at that mark. I now had the length and height I needed for each basket's lining (sorry I never measured it out in feet. I just used the first one as a pattern for all the planters.).
To glue it to the basket I started with the top edge. I hot glued it to the top of the inner rim, starting with the lining corner and gluing to the rim edge all the way around. Make sure that the liner overlaps a few inches. Where the weed liner overlaps down the inside of the basket, I ran a line of hot glue to make sure it was sealed and the dirt couldn't get out there. For the bottom I pressed down the remainder of the liner against the basket floor. It will gather itself, it doesn't lay flat. I just worked with it until I was happy with how it gathered into a circle. I finished it with some hot glue to keep it down.
**DO NOT FORGET** Plants need drainage! To make drainage holes I took the biggest nail I could find and drove it through the bottom of the basket with a hammer. I flipped the basket upside down before I did this. I probably made at least 15 holes in each one. If you are worried about it not being enough, add some large gravel to the bottom of your planter before you add your dirt. This will improve drainage greatly.
Now It did cross my mind that the glue might heat up in the sun and come off the basket (as is hot glue). If you have a lot of days that reach over 100 degrees... this is very possible. The glue on the burlap has stayed 100% intact. If you glue the liner straight to the plastic basket, though, it might pull off in a really hot day. I found that if you fill you basket all the way with soil, the weight of the dirt will keep the liner sitting properly in the basket. After you have filled and planted you garden, you don't need to worry about that. The only baskets I actually had the lining pull off of was the ones where I painted them and glued the liner to the painted basket.


In the above pictures I have the $5 brown rectangle baskets I bought. They had a basket woven style already, so I opted to just glue the liner straight to the basket with these. It took the whole width of the weed liner to line these. I simply laid the liner in the basket and folded the corners in (the same way you would when you gift wrap a box, only reveres). Then I cut off the roll leave enough over lap around the rim to fold under the basket rim edge and glue down. If there were any gaps, I took a little piece of liner and glued it over the spot.


The third style of basket I experimented with was to paint the baskets tan. I laid out cardboard and sprayed the bottoms. Let them dry, then sprayed the top halves. I used Rust-oleum 2X ultra cover satin paint that sticks to plastic.
I needed more space in my garden so I went back to Walmart and grabbed up some $3.97 rectangular baskets (seen above). I added burlap to all off the spray painted baskets, like I had done the white ones.
 |
| Pallet platform for my laundry basket garden. |
 |
| Pallet platform for my laundry basket garden. |
I wanted to make my laundry basket garden have different levels. This helps me control how much light each plant gets. It also looks much prettier than just laying out baskets in your yard. To achieve this I made a platform from some old pallets I had laying around. Sadly, I don't have any step by step pics on this. I used a full pallet for the top. I cut a second pallet into three equal parts. I made the bottom frame out of the three equal parts. I simply shaped them into and "I". Two bars for legs, and one bar that goes across the middle for support. I screwed them together with 1.5" wood screws. I laid the full pallet across the top of the "I" structure and secured them together with metal brackets I got from Walmart for under $2. Done! It isn't perfectly made by any means, but it is strong! And almost free (just the cost of screws and brackets).
Putting on and arranging the baskets!

I started with the putting the larger brown baskets for my tomatoes on the top. I did end up moving two of these down to the ground and sliding the other two in the middle of the platform. I put four smaller baskets that I found at a yard sale, then lined with a piece of burlap to surround the brown baskets on the top tier. I liked this better then the square look I was getting from all four big brown baskets being on the platform. You will see this change in later pictures below.


During the making of all my planters, I ran out of black weed barrier lining. Uhg! I had no desire to make yet another trip to the store, so I started lining my baskets with burlap. I used the same process as before, I just switched materials. The burlap lining works just as well as the weed barrier lining. The burlap is more expensive, though. It does look beautiful on the other hand!


I rearranged my baskets until I was happy with how they looked. I started to add little accents like cut logs, tin can planters, decorative garden stones, and dried up grape vines I had pulled out of the woods. To be able to fill the smaller spaces between the laundry baskets, I went to a few yard sales and bought up all the cheap baskets I could find. I bought most of them for $1 or less! What a deal for a planter!
To keep in the dirt and moisture, I lined each basket with a single piece of burlap. Usually, you don't need to poke any holes in baskets or the burlap lining. The water seeps out of the holes that already exist with these materials.


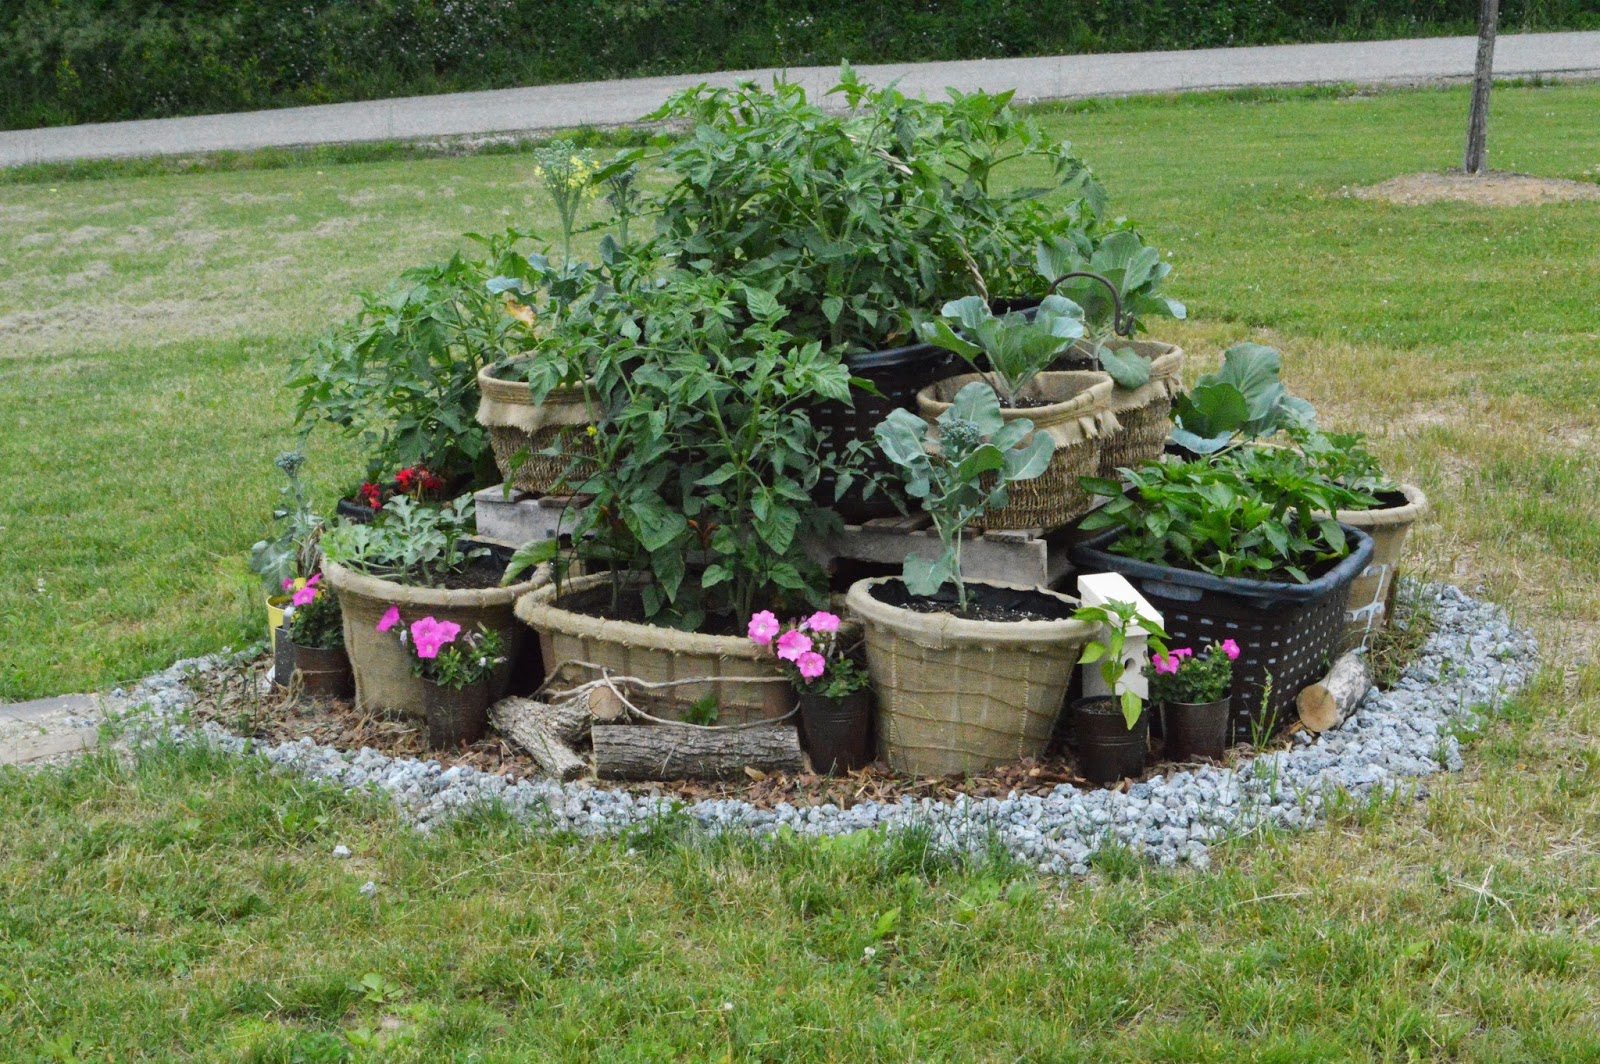


To help keep the grass from growing up between my baskets, I laid down pine mulch around my garden. I also decided to make a small stone path up to my garden. Cute! The last touch was some lava stone gravel around the outside of the mulch. Done!
I am so pleased with how it turned out! As you can see, the plants are doing quite well. They love their laundry basket home! I did want to add that the dirt combination I used was half potting soil and half compost/manure. Pour in half and half then mix together. The plants love it!


